Thursday, December 1, 2022

How to Make Old Fashioned Southern Cherry Yum Yum


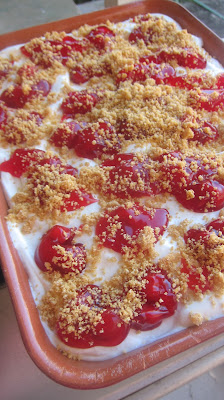
This is one of my all time favorite desserts. It is a very luscious dessert, it's super easy to make (no baking). It also looks so pretty with the red and white colors.

I was thinking back to when I first made this dessert, and I'm pretty sure it was during college, so I've been making it for 40 years, and it wasn't a new recipe when I got it from one of the church ladies. It's been a while since I've made it, and it is just as wonderful as I remembered. 

The only confusing part of the recipe might be the pack of Dream Whip. DW packs come in a cardboard box with four pouches of dream whip powder. That is what I use, but I would imagine you could buy the Dream Whip in the plastic containers. They may not have made it in containers when the recipe was first going around. Not sure on that. 

I'm sure you could use other pie fillings like blueberry or strawberry with this recipe, but I love the pie cherries which I could eat with a spoon out of the can. 

I hope you love Cherry Yum Yum as much as I do!

Cherry Yum Yum Recipe

Ingredients:

1 ½ cups graham cracker crumbs

1/2 cup melted butter

¼ cup sugar (for the crust and 3/4 cup later for the Dream Whit mixture)

1 pack  Dream Whip 4 oz size (This is a pack of powder and usually comes 4 pouches to a cardboard box.)

½ cup milk (I use whole milk.)

¾ cups sugar

1 teaspoon vanilla

1 pack of cream cheese 8 oz (Let it sit out a while, so it will mix easier.)

1 can of cherry pie filling 22 oz


Directions:

Mix together the graham cracker crumbs, ¼ cup sugar, and melted butter. Save ¼ cup or so of the mixture to sprinkle on top.

Press the crumb mixture in the bottom of an an oblong baking dish – size around 8 x 12. It's easier to use your fingers to press down the crumb crust.

Use a mixer to whip the milk and package of Dream Whip until fluffy and shiny.

Add ¾ cup sugar, vanilla, and cream cheese to Dream Whip mix and mix until evenly distributed.

Layer the Dream Whip mixture and the pie filling. First layer is half the DW on top of the crust. Then, use a spoon to dallop half of the pie filling on top. Add the rest of the Dream Whip and spread out. Dallop the rest of the cherries. Top with the saved graham cracker crumb mix.

Chill for a couple of hours or overnight.
Tuesday, November 29, 2022

How to Make Pecan Goat Cheese Truffles (Goat Cheese Balls)


This recipe is from Sue White who lived across the road from me when I was growing up and still lives there to this day. Sue was and is one of the best cooks/bakers in town.

Sue made these treats for the library recipe swap 2022. Everyone loved her goat cheese balls, and Allison and I made the recipe for Thanksgiving. Well, mostly Allison made them, and I rolled them in the nut mix.

It can be a little bit of a challenge to find the goat cheese around here, but it is worth looking for it. The goat cheese gives a kind of rich bite that contrasts really well with the tart cranberries. The pecans and parsley add texture and color.


Cranberry Pecan Goat Cheese Truffles Recipe (Goat Cheese Balls)


Ingredients:

1 package of goat cheese 10 oz

1 pack cream cheese 6 oz

2 tsp cinnamon

3 tbs honey (plus extra for garnish if you want)

1 ½ cups chopped pecans

1 cup diced dried cranberries

½ cup minced fresh parsley

Stick pretzels


Directions:

1.      Cream together with mixer the cheeses, cinnamon, and honey.

2.      Fold in ½ cup chopped fine pecans

3.      Combine the rest of the nuts, cranberries, and parsley and spread on a large piece or parchment paper on cabinet.

4.      Make small balls (between 15 and 20) with the cheese mixture and roll in nut mixture on parchment paper.

5.      Chill cheese balls.

6.      Put stick pretzel in each cheese ball to serve. 


NNotes:

YYou can make this as a large cheese ball instead of the individual balls. The small balls are a little hard to roll. It might be a good idea to chill them mix a while before rolling them up. 

Thursday, November 10, 2022

How to Make Old Fashioned Oatmeal Raisin Cookies 1950s


I think my all time favorite homemade cookie would have to be these old fashioned oatmeal raisin cookies. Grandma made them. Mom made them. I make them. And, family members and friends all love these ugly oatmeal cookies which are moist and flavorful and super soft out of the oven.

The thing that I think makes these cookies extra good is that the raisins are heated to a simmer beforehand, and that plumps up the raisins for an extra fresh flavor. Also, the water that the raisins were simmered in is the liquid in the recipe which also gives the cookie a nice raisiny flavor. 

The cookies date back at least to the 1950s, and I was not born then. They use Crisco instead of butter in the recipe. My first thought was that was to save money, but Grandma churned her own butter and bought Crisco, so maybe it was a treat and an extra cost to use Crisco in a special cookie. If anyone knows more history, please jump in on comments. 

Oatmeal Raisin Cookie Recipe

Ingredients:

1 cup raisins

1 cup water (for simmering and drain and save 1/2 cup for later in recipe)

3/4 cup Crisco shortning

1 1/4 cup sugar

2 eggs

1 teaspoon vanilla

2 1/2 cups plain flour

1 teaspoon baking soda

1 teaspoon salt

1 teaspoon cinamon

1/2 teaspoon cloves

2 cups old fashioned oats

1/2 cup of broken walnuts (or more)

Directions:

Put the raisins and water in a small pan and simmer for 15-20 minutes or so. Drain off liquid but save 1/2 cup for later in the recipe.

Cream Crisco and sugar and add eggs and vanilla. Mix until smooth.

Mix together flour, baking soda, salt, cinnamon, and cloves in a mixing cup or bowl.

Rotate mixing in reserved raisin water (1/2 cup total saved from the simmering- just add more water if you come up short) and the flour and other dry ingredients. Aim for about one third of wet and then dry, repeat, repeat and mix until pretty even.

Use a big spoon to fold in oats, raisins, and walnuts. 

Bake at 400 F for 8 to 10 minutes on ungreased cookie sheet or with parchment paper on cookie sheet. 

Tip: Drop the heat to 380 if the peaks on the top are getting too dark while the rest of top is white-ish. This does not impact the taste but makes the cookies prettier if the high heat is causing uneven browning.

 This recipe makes 5 to 6 dozen depending on how big you spoon them.


Sunday, October 30, 2022

How to Make Dinner Rolls (with yeast)


Everyone in my family loves yeast bread. 
 
My grandmaw and mom made Parker house rolls rolled out and cut with a biscuit cutter and then folded in half. That is a pretty big recipe even when cut in half, so I like to make this smaller buttery yeast roll recipe for regular days (which are still special if we have yeast bread). These rolls are the round type.

Here is what you need to make Yeast Dinner Rolls.
 
2 teaspoons yeast
2 tablespoons sugar (one with the yeast and then one mixed in with the flour)
1 cup warm milk 
3 cups plain flour
1 teaspoon of salt
1 large egg
Half a cup of melted butter
 
 
Here is how you make the yeast rolls.
 
Put the yeast and one tablespoon of the sugar in a medium bowl.
 
Warm up the milk to 105 to 115 degrees. Do not get it too hot, or it will kill the yeast. Pour that in with the yeast and sugar. Stir and then cover for 5 to 7 minutes for the yeast to "work." 

Melt the butter in a mixing cup or bowl until melted.

Add the egg, melted butter, flour, salt, and that other tablespoon of sugar and mix well.

Lightly flour the cabinet and knead the dough for around 10 minutes or until the dough is smooth.

Put the dough in a large greased mixing bowl and cover with Saran wrap. Let it rise until double which can take from an hour to sometimes as much as three hours. 

Punch down the dough and then roll into small balls and place in a greased baking dish. I use a 9 x 13. 

Let the rolls rise again until double in size. Cover with Saran wrap, because that helps hold moisture and heat and aids in the rising process. 

Bake at 350 F for 15 to 20 minutes or until the tops are browned.

Spread a little butter on top as soon as the rolls come out and are still hot.

Saturday, October 29, 2022

How to Make the Best Ever Apple Muffins with fresh apples


How to Make Fresh Apple Muffins

I live in North Carolina close the mountains where we have apple orchards. Also, I have my own heirloom apple tree that my son Caleb gave me for my birthday.

I’ve tried lots of apple recipes, but this is my favorite one for bread/muffins. The secret to this apple recipe is that you grate the apples, so that you don’t have hollow holes and hunks of mushy apple inside the bread.  The texture and flavor with grated apples is just amazing.

The array of spices in the recipe is also great. You can play around with spices of course, so if you have pie spice etc, you can also try that in place of something or just an addition.

I am pretty sure you’ll love these muffins. I was up last night at 4 am eating three of them, because I could smell apple muffins all through the house.


Apple Muffin Recipe with fresh apples


1 ½ cups old fashioned oatmeal

1 ½ cups plain flour

¾ cups brown sugar

1 teaspoon baking powder

1/4  teaspoon baking soda

½  teaspoon salt

¾ teaspoon cinnamon

½ teaspoon ground cloves

½ teaspoon nutmeg

½ teaspoon ginger

½ teaspoon allspice

½ walnuts ( or more)

1/3 cup cooking oil

2 eggs

5 apples (I like to use 3 Granny Smith and 2 Fuji)


  1. Mix together all the dry ingredients in a large mixing bowl. Mix this really well.
  2. In a small mixing bowl, beat the eggs with a fork and then mix with the cooking oil.
  3. Stir the nuts in the large mixing bowl with the dry ingredients. This coats them with a little flour so they do not sink to the bottom.
  4. Core and peel the apples and then grate. I use a hand cheese grater. Yes. It is a lot of work, but this is what makes these muffins taste fabulous.
  5. Pour the egg/oil in the bowl of dry ingredients and add the grated apples. I suppose you could mix this with a spoon, but this is thick batter. It works best to just use your hands and smash the ingredients with your hands. Just squeeze until everything is well mixed. Do not overdo it. Quick breads get rubbery if over-mixed.
  6. Put paper liners in muffin tins. This recipe makes 18 total cupcakes. Spoon the batter into the paper cups. Yes. The batter is really thick. You may need to lightly tap the batter into the paper cups, but do not mash down tight. Just even them out a bit.
  7. Bake for around 30 minutes at 375 degrees F. 

Let cool and eat. They are okay when hot, but the flavors meld and the apples settle after a couple of hours, and then these muffins are fabulous – as good as any apple muffin I’ve ever eaten anywhere.